Getting Started
Getting up and running with Reex API Builder is designed to be frictionless. The tool handles dependency installation and infrastructure setup in your React application automatically.
Prerequisites
Before installing, ensure your environment meets the following requirements:
- Node.js: Installed and configured.
- React: Your project must be a React-based application (e.g., Next.js, Vite, React Router).
- TypeScript: Your project must be a TypeScript application.
- Package Manager:
npm,yarn, orpnpm.
Step 1: Install the CLI
Reex API Builder relies on a global CLI package to bridge the connection between the Reex API Builder UI and your local project files.
Open your terminal and install it globally:
npm install -g reex-api-builderStep 2: Initialize Your Project
Navigate to the root directory of your React project and run:
reex-buildRunning this command triggers a health check. Reex API Builder detects any missing dependencies and installs them automatically:
- Axios: For handling HTTP requests.
- TanStack Query (React Query): For server state management.
- next-auth: For authentication and session management in Next.js applications.
- cookies-next: For cookie management on both client and server sides.
It also generates an api-services directory in your project root, containing your API hooks, models, authentication guards, and providers.
The application then launches and automatically opens your browser to:
https://reex-api-builder.toolshq.app/?localPort=4000
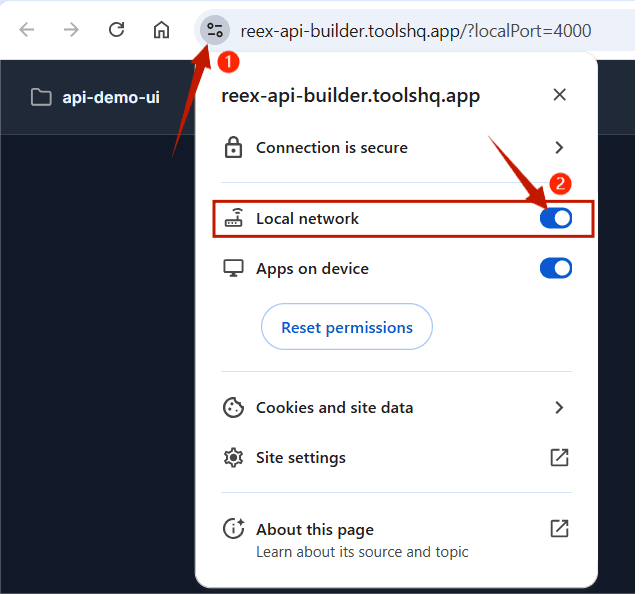
On first launch, you will be prompted to grant Local Network permissions to enable communication between Reex API Builder and your local project files.
Note: To run multiple projects simultaneously, switch ports using the
-pflag:reex-build -p 4002
Step 3: Import a Collection & Configure Authentication
Navigate to the Reex API Builder UI and import the API collection you want to integrate.
After importing, the api-services directory will be updated with the following:
definitions/: A structured REST API definition based on the imported collection.generated/: React Query hooks for all REST endpoints defined in the collection.types/: TypeScript type definitions for all endpoint responses. Types default tounknownuntil explicitly updated by calling the endpoint and saving the interface in the Reex API Builder UI. Manual edits are possible but not recommended — if you do, strictly follow the existing naming convention, as deviating from it will break your code.
Step 4: Configure the Providers
Reex API Builder generates dedicated provider components to manage query client context and authentication. Wrap your application with these providers to enable the generated hooks, manage API state, and handle user sessions.
- Open your project’s root file (e.g.,
layout.tsxfor Next.js App Router, orroot.tsx,main.tsxfor standard React). - Import
QueryProviderand your chosenAuthProviderfrom theapi-servicesdirectory. - Wrap your root layout or component with both providers.
Here is a sample configuration for a Next.js app:
import type { Metadata } from "next";
import { Geist, Geist_Mono } from "next/font/google";
import "./globals.css";
import { QueryProvider } from "@/api-services/providers/QueryProvider";
import { AuthProvider } from "@/api-services/auth/AuthProvider";

const geistSans = Geist({
  variable: "--font-geist-sans",
  subsets: ["latin"],
});

const geistMono = Geist_Mono({
  variable: "--font-geist-mono",
  subsets: ["latin"],
});

export const metadata: Metadata = {
  title: "Create Next App",
  description: "Generated by create next app",
};

export default function RootLayout({
  children,
}: Readonly<{
  children: React.ReactNode;
}>) {
  return (
    <html lang="en">
      <body className={`${geistSans.variable} ${geistMono.variable}`}>
        <QueryProvider>
          <AuthProvider strategy="localstorage">{children}</AuthProvider>
        </QueryProvider>
      </body>
    </html>
  );
}- QueryProvider: Enables TanStack queries.
- AuthProvider: Manages user sessions and authentication. Supports three strategies:
localstorage,cookie, andnext-auth. Defaults tolocalstorage.
For a deeper look at the auth provider, see the architecture section.
Important: After importing your collection, update the
auth.tsfile inapi-services/user-configwith your backend-specific details.
Step 5: Test Your Endpoints
Open the Reex API Builder UI and test your endpoints. For every successful request, a response and a corresponding interface are generated. Click Save Interface to persist the interface to your project’s types folder.
Step 6: Start Consuming Your APIs
Your setup is complete. You can now start using the generated hooks and services in your project.